Press "Enter" to skip to content

Category: DIY

Scanning with C.R.I.P.S.R.I.S.E.

I’ve written a lot about GOAT’s book scanning activities for our archival work, but today have another kind of scanning to talk about! Last week I met with @CriptasticHacker from C.R.I.P.S.R.I.S.E., to walk through the process of scanning a physical object for 3D printing. Buckle up, this is nerdy as hell!

First of all I would like to show off the useful object that @CriptasticHacker brought to show me. His Whill powerchair joystick was slipping around, so he took it apart and had a look. It turns out the inside of the joystick has a plastic part that snaps onto a metal post. Because of the way it is designed, you can change the orientation of the joystick from vertical to horizontal so it fits your hand for steering. Over time though, and daily use, bits of that plastic part wore away so that the joystick slid around uncontrollably, making it hard to drive accurately. So he scanned that part, redesigned it, and 3D printed it.

Here’s a comparison of the old and new parts side by side:
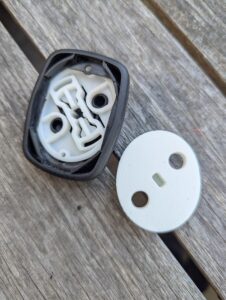
view of the inside of two plastic joystick interiors, one with holes in it and a worn out inner slot; the other freshly printed, solid, and robust

Pretty cool isn’t it?!

@CriptasticHacker is largely self taught over many years of watching free online videos and experimentation at home. There are also local and worldwide 3D scanning and printing communities where he has gotten advice and other resources.

His original setup was a Creality Ferret, an infrared only scanner which you can buy for around $150. Very affordable! For this demo, he brought over a borrowed Creality Raptor, more expensive and more accurate which can do infra scans but also a blue laser scan. The Raptor is larger than the Ferret, but still quite portable. Along with that, he had a small turntable with dotted “reference points” on it in a regular pattern. (That turntable was made from 3D printed parts!)

There are also other accessories, like a carrying case, a portable handheld gizmo that looks like the things they use to do checkout in grocery store, tripods, etc. and extra stickers with more reference dots you can put onto larger objects that don’t fit onto the turntable. There is also an infrared spray But for this demo we stuck with the basics!

Our first step was for me to install the free Creality scanning software. With my 5 year old MacBook Air and a decent wifi connection this took just a few minutes to download and install. This software connected to the Raptor easily.

I was excited to try to scan something small but complicated. In a project bag I had out I happened to have an old prescription bottle with some screws in it so we took off the cap.

For people who may not be familiar with the free/open culture and “open source” vibe, I should explain that I 100% expected that someone, in fact multiple people, around the world have already scanned, cleaned up, and published designs for this exact sort of standard medicine bottle cap. That turned out to be true! Here are some examples from Thingiverse, Printables, and Yeggi, which are some popular platforms for designers to share their creations with the world, as a public good, often under Creative Commons licenses.

The software seemed pretty mysterious to me, but @CriptasticHacker walked me through the basic settings. For an older computer he recommends setting the resolution of the scan to lower than the default of .15mm; something more like .5mm. A lower resolution and lower frame rate means less precision for the final design and print, but also means a quicker scan time, and smaller file sizes and faster processing for the software tricks we were about to perform. I wanted to try with the defaults of .15mm resolution and 23fps frame rate, which luckily my computer was easily able to handle.
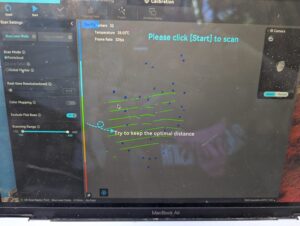
shot of the scanning software setup page with frame rate options and a "start scan" button

Our next step was to put the object on the turntable, hit “scan”, and turn the dolly slowly. As that happens, the image of the medicine bottle cap formed on my laptop screen first in an orange outline and then in blue “paint” as the surface was mapped more precisely. The goal of the scans is to get everything mapped in blue, as much as possible.
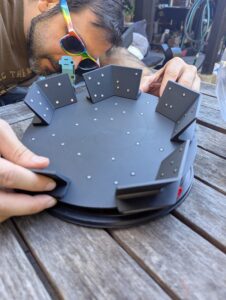
a guy in rainbow sunglasses bending over a scanning turntable to adjust it

We then stopped the scan and started a new scan with the cap flipped over. I wasn’t going for production quality — just enough to give me an idea of what it took to do a decent scan. Our two scans were about 300MB each.

With these two initial scans, the next step was to eliminate everything that wasn’t the stuff we wanted to print. That meant a pretty clunky process of lassoing and deleting parts of the image with a non-ideal navigation menu. Good luck with this if you don’t have great hand dexterity – if so, you will need to partner with someone else to massage your image files! I gave it a quick stab.

After the image cleanup, you have to match up the files so that they line up properly. In this case, we needed a point on top of the cap and at least two other points, to match points on the bottom. Our first two tries sucked, but then we kind of figured out how to align the files well enough to merge, or fuse, the two images. The end result was a 3-d looking object, a bit raggedy, but recognizable a screw top lid for a medicine bottle. We then exported this as an STL file which turned out to be about 5MB. Much better than the 600MB scan files we were manipulating in Creality’s software! STL files are a common format used by 3D printers.

From there, we uploaded the STL file into a CAD program. There are tons of CAD programs and people spend years becoming great at using them! Some are expensive but there are also free options. @CriptasticHacker showed me a free CAD program called TinkerCAD, that works in a web browser and that I think may be meant for children or at least, for educational settings. In this program we could further edit and manipulate our 3d printing file. So, for example, I could click on the pre-set shape options in TinkerCAD’s menu and drag a 3-d blob or some text over to the top of our bottle cap to add it.

It was really fun just being able to rotate and zoom in on this virtual object, and I felt like a wild, futuristic wizard doing it!!
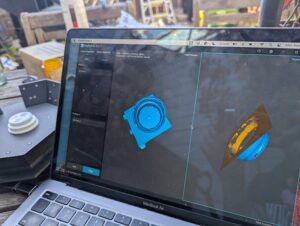
laptop screen with two 3d images of a bottle cap rotated in different directions, behind it, the actual object on a turntable platform

If you weren’t actually scanning, and instead started with a base STL file, say, that you downloaded from Thingiverse or a similar platform, you could modify the file, add raised text or a more grabbable shape easily to the bottle cap. Then, you could export that new STL file and print it on a 3D printer.

And that’s another post for the future, when I will go through some of the printing process with C.R.I.P.S.R.I.S.E.!

There are other options that don’t require you to own a 3D printer and learn to use it. Local libraries or schools or makerspaces may have 3D printers, or experts to set them up and help you print. Under the U.S. Assistive Technology Act, there are programs in some states to provide 3D printed assistive tech for people, like TechOWL/CreATeLabs in Pennsylvania or WATAP in Washington state. Makers Making Change has many people who may 3D print stuff for you for free or a small fee.

Other options include looking for local or far-flung printing labs who will make stuff for you for a fee. I have not tried this yet, but am told that it has become surprisingly affordable and can be worth it for custom parts. Some that we talked about: Proto Labs, Makelab, Shapeways, Xometry, and JLC 3d Prints.

You can also print in different materials depending on what you need. PetG or PLA filament, nylon (tougher, but slower to print and needs a lot of ventilation to avoid fumes) or carbon fiber (toughest but also slowest).

A final thought form Criptastic Hacker and C.R.I.P.S.R.I.S.E.:

Disabled people deserve to have customized stuff! Not rattling half broken things that don’t suit our needs!
guy in rainbow sunglasses smiling and doing a big thumbs up at an outdoor picnic table

2 Comments

TechOWL and ATAP programs

There are a lot of programs for improving access to assistive tech at the state level, often supported by universities and independent living centers. TechOWL at Temple University in Pennsylvania is a great example, with tons of resources and material if you want to learn about AT options. It stands for Technology for Our Whole Lives. (We love a cute acronym here at GOAT!)
Resource centers like TechOWl exist in part in the U.S. because of support from the Assistive Tech Act of 1988.

Every U.S. state and territory has a mandate, and state funding, to give people access to learning about, trying out, and obtaining assistive tech via an Assistive Technology Act Project (ATAP).

They all do four things :

  • Lending library for assistive tech
  • Used equipment program, often run by a group of contractors or vendors.
  • Presentations and trainings, workshops
  • Consults and demos for people to problem solve and explore AT

So, TechOWL is the ATAP for the state of Pennsylvania.

A few years ago, because they had a staff member with some expertise in 3D printing, they started the CreATe Together project for 3D printing assistive tech. That has grown to become a well supported program with an online catalog of standard devices you can request (if you live in Pennsylvania), and they’ll find a partner to make it for you. They also can handle some custom requests.

It is an interesting model that I’d like to see more of in California, where we have Ability Tools as the main ATAP program, with a strong focus on reuse but not a lot of “maker” activity that I’ve found.

The level of AT you can make with a 3D printer seems a bit limited. In the TechOWL catalog we see mostly small gizmos that can help a person with grip strength or dexterity problems. This makes sense on one level because for AT that has a more critical function there could be quality control safety risks that a state funded program (with an array of loosely associated fabrication shops or volunteers with home workshops) is not prepared to handle.

On the other hand I could already use a bunch of these little plastic gizmos. A thing that punches pills out of those annoying blister packs? Hell yeah!

You can see a slightly wider array of 3D printable devices on sites like Printables or Creality – or the Internet Archive’s backup of older Thingiverse models.

It would be very interesting to go through all these sites and categorize the types of assistive tech that we can find there!

Leave a Comment

Building simple switches

In the material we are scanning from Alexandra Enders’ collection of DIY assistive tech information, we have come across several great sources for learning the basics of electronics in order to make switches, buzzers, and other small gadgets, very useful for people with limited dexterity to control other devices.

I really like these short, practical guides. Rather than having to wade through a college textbook level guide to electronics, you get just the basics you need to build very cheap and easy gadgets.

Today’s scan is simply called “Introduction to Electric Circuits”, written in 1981 by Hugh O’Neill from the Rehabilitation Engineering Center at Stanford.

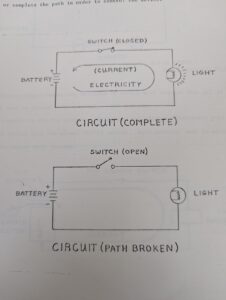
He explains what a circuit is – an unbroken path from one terminal to another of a power source, through which current can flow. A good overview of circuits in series and parallel comes next, including the tip that most simple toy adapters the AT maker will build, will be in series.

Types of switches covered are toggle, rocker, push button, microswitch, rotary, and mercury (tilt) switches.

It’s a very condensed electronics course in about 15 pages! If you walk through it and try the instructions, you will learn enough about how batteries, switches, circuits, and so on work that you can build many adaptive devices.

Have a look: https://archive.org/details/introduction-electric-circuits

a diagram showing a complete and a broken circuit

Leave a Comment

Love Your Ride – wheelchair maintenance and repair workshop

GOAT is running another free workshop in San Francisco, at the Independent Living
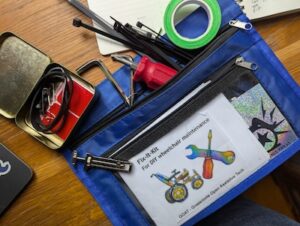
Resource Center SF! In honor of Valentine’s Day we are calling it “Love Your Ride”. At this event we will test out our pilot Fix-It-Kits, which are small pouches of tools and materials, along with a pocket sized zine.

The zine has a workbook page to record useful information about your mobility device, and then goes through inspection, cleaning, checking vulnerable points like all bolts, screws, wheels, folding parts, and attachments. Collecting that info will help us construct a custom kit, with replacement bolts, tools for tightening bolts and screws, and so on.

a colorful zine and some tools coming out of a zippered pencil pouch

Free workshop to learn maintenance for your mobility gear
Wheelchairs, powerchairs, scooters, walkers, rollators, etc.

Time: Saturday, Feb. 22, 2:00pm – 4:00pm
Location: ILRCSF, 825 Howard Street – San Francisco

FREE TOOLKIT AND INSTRUCTION MANUAL

We will work with you to make a custom maintenance and emergency repair kit!
You will get to take home a small, portable bag with tools and materials customized for you.

There is also a workbook to fill out with information about your mobility device or devices.

We will look for service manuals and other information to give you as well!

Please register by emailing Brianna@ilrcsf.org with your name, phone number, and any particular access needs you have. Or you can call or text Vincent @ 415-609-2555 if you prefer that to email. We’d love to see you there!

A joint workshop by Grassroots Open Assistive Tech and ILRCSF
Liz Henry, liz@openassistivetech.org, https://openassistivetech.org
Vincent Lopez, vincent@ilrcsf.org, https://ilrcsf.org
Marisol Ferrante, marisol@ilrcsf.org, Nick Feldman Assistive Tech Lending Library

Leave a Comment

Be Seen on Halloween: a workshop for DIY lights and safety mods

In a collaboration between GOAT and San Francisco’s Independent Living Resource Center, we held a pilot workshop in downtown SF last month, where we provided lights, reflectors, reflective tape, and other useful modifications for mobility gear.

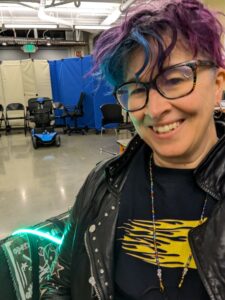
This is a photo heavy post! Here’s me smiling to welcome you to this workshop:
white non binary person with glasses and purple hair, smiling, wearing tshirt with wheelchair user with symbolic flames trailing behind them

We hosted at ILRCSF, where Vince Lopez runs a free wheelchair repair program. There, SF residents can get maintenance and repair done on their tech – and if you get stuck at home or on the street with a broken chair, Vince will come out, fix the chair or get you to a safe place and take the chair for repairs. You can even borrow a loaner powerchair, scooter, or manual chair. Also from ILRCSF, Marisol Ferrante joined us, to show off the Nick Feldman assistive tech lending library, another great free resource.

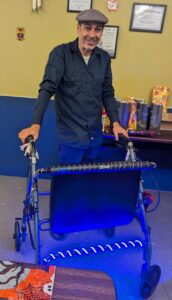
Vince displaying a walker with spiral LEDs:
Vince, smiling latino man with a flat cap, holding a lit up walker

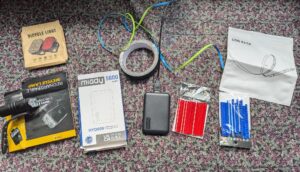
We laid out all the gear that we bought to try out for the event, including reflectors and headlamps made for bicycles, reflective tape, and various kinds of LED strips; mounting clamps, straps, cable ties, gaffer tape, and portable usb battery packs.

an array of small gadgets laid out on a tablecloth

None of this is very “high tech” but having it all there together made a great introduction to thinking about ways to modify mobility gear. When you set out to do this, you have several issues in play:

* DURABILITY: The mods need to be very durable for heavy use, or easily replaceable.
* PINCH POINTS: You need to be aware of how your chair, scooter, walker, etc. fold or are put into storage or, say, a car trunk, so you avoid putting any fragile components onto “pinch points”.
* ATTACHMENT POINTS: You need to consider ways to attach things to your gear. That may mean velcro or cable ties to a metal tube frame, or some other method of attachment. Clamps meant for motorcycles, bikes, or camera tripods often work well, but every wheelchair is different, and people also have different use patterns for them.
* POWER: If you are dealing with electronics, as we were with light strips, you need a power source. I like external battery packs, because they are easy to attach to a frame, or put into a small pouch.
* COST: Often, cheaper is better! It can be a tradeoff between durability and cost, though.
* DIY-ability: You may need easy do-it-yourself solutions. Ideally we would have the resources of an auto body shop, and be able to cut and weld metal, but that isn’t always realistic!

We had a blast setting people up with gear. Everyone had a try at installing their own equipment or working with people who came with them to get lights on their walkers and wheelchairs.

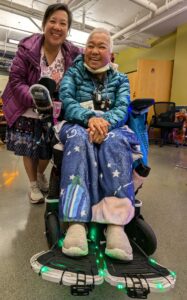
Judy worked with me and her daughter to line the bottoms of her foot rest plates with twinkly christmas-light style LEDs. The LEDs also had a remote control so she could change their color. She also asked for two headlights pointing downwards from the footplate so that it would be easier for her to see curbs or bumps in the sidewalk.

Part of the fun of working with other wheelchair users for me is always seeing how they have come up with their own solutions. Judy’s main hack was that she had dozens of rubber bands of all sizes around her powerchair arm. She used these to keep her phone in place on the wide arm, and then set up the remote control for the lights on the other arm of the chair. I am adding the deceptively simple (and cheap!) “plain old rubber bands” solution to my tool box!

While we installed the lights I also noticed Judy’s foam insulation tape added to the rim of her footplates. If you have been in a powerchair user’s house you may have noticed some dents in the walls! And things like protective strips along corners that stick out, because a powerchair packs a lot of force even at low speeds. The easily replaceable, cheap foam strips are a great idea to save wear and tear on your walls and other people’s shins! But, Judy’s daughter mentioned they peel off and look kind of bad as well. I suggested narrow black gaffer tape wrapped around the foam and foot plates. It isn’t perfect, it won’t last forever, but it will look nicer and will make the foam last for a year or two instead of a month. To refresh it — just add more tape! Gaffer tape is more expensive than duct tape, but is flexible and will last much longer.


Video description: an asian american lady in a powerchair, waving, and her daughter, posing with smiles as the lights under the chair’s footrests blink and glow.

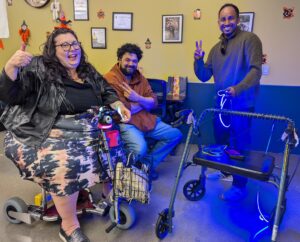
Deniz came with a travelscoot and a walker, and her own pit crew who were very enthusiastic helpers! They went for the lights, and installed COB (chip on board) LED strips along with a cable splitter and a battery pack on each device. The Y splitter means you can symmetrically install two light strips and plug them into one centrally located battery pack. Their install job was flawless!

A smiling woman with a halloween party hat, sitting on a travelscoot, with two guys doing thumbs up behind her

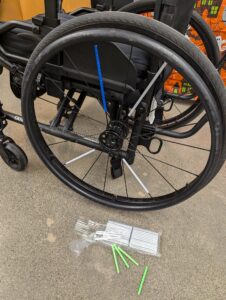
Bill tried out some lights of various kinds, including spoke reflectors for a manual chair. These spoke covers are small and fiddly and annoying to install, but they are also cheap and last a good long time. They also may pop off occasionally and need replacing, but I prefer that to having peeling or scraped up reflector tape making my spokes look all tattered. Bill did a few and got help with more, and then took a pack home to keep working on the project. I would like to find longer covers – they seem to come in this standard size of 3 inches and so you need multiple tubes per spoke. How much easier if they were longer! Let me know if you find a good source for these.

manual chair wheel with small reflector tubes that pop on over each spoke

A lady I met at the season opener for Philhamonia Baroque took my flyer and, fabulously, showed up with her husband and her very snazzy European style walker. She did a great job installing an LED strip set, and got a tuneup and some bolts replaced on her walker by Vince. I think that was true for others as well at the workshop.

A lady smiling proudly as she shows off her newly illuminated walker with spiral light strips attached.

Of course, one of the goals of our workshop was to let people know they can use ILRCSF’s free repair program! Marisol also led several people on tours of the Nick Feldman Lending Library where you can borrow all kinds of useful gear, try it out to see if you like it, or just keep it while you need it and return when your circumstances change. I have used this program in the past and it was incredibly helpful.

We had so much lively discussion during the workshop. Gear reviews, complaints about what doesn’t make sense about either the DME industry, health issues and health care of course, Right to Repair laws now in play in California, and plain old brainstorming about future events. I was so pleased that everyone wanted MORE hands on, DIY events in the future!

The whole event was a lot of fun. We had planned for 2 hours, but ended up staying for over 3 hours. I think next time we will try to get more helpers – because modding any assistive tech is so individual and needs individual attention, brainstorming, experimentation, and so on! And, we could try for an entire afternoon or spanning late afternoon and early evening.

Some participants want to volunteer for our next event! That may be in December or January and will likely add some other category of modification — I’m thinking about pouches and cup holders as our next focus. They are simple, and everyone wants them, but figuring out what exactly will work for a person and their device is a complex process. It may end up being clamps like the motorcyle and bike ones we had for our Halloween workshop, or it can be something like fabric, leather, canvas, or even duct and gaffer tape along with velcro. Leather working tools can also be super useful in creating custom pouches and bags to attach to a chair!

We will also be looking in future to host similar workshops in the East Bay jointly with the CIL and other organizations! Stay tuned!

Here’s a few more photos:

Me and Deniz in conversation,
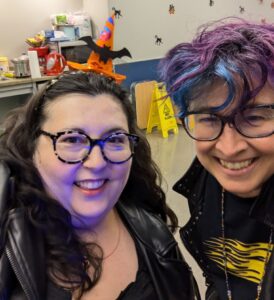
smling woman with halloween party hat, liz grinning, with wheelchair in flames tshirt

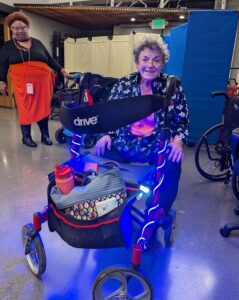
Walker DIY in progress,
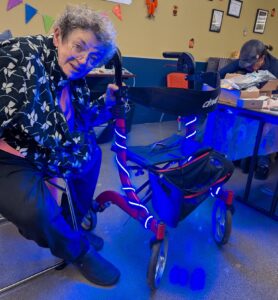
walker diy in progress, a seated lady with silver hair bending over her walker and its light strips with cable ties in hand

Judy and daughter,
Two asian american women smiling, one seated in powerchair with lights attached

1 Comment