Press "Enter" to skip to content

Author: openassistivetech_e02gls

Small modifications to a Whill powerchair

And now for something completely different! Last week we saw some highly technical wizardry. Today I spent some time just cobbling things together with low tech “found materials” in my basement, to minorly improve and modify my powerchair.

My Whill C2 powerchair needed a cane holder and I had a section of PVC pipe set aside to make one. You can get a $100 fabric cane holder, kind of like a quiver for arrows, from Whill, but I figured why not spend a dollar to make one instead.

Here’s my short length of pipe, with holes drilled into it, ready to attach to the chair frame. I figured I could find somewhere to put it, and got out some cable ties and other material to see what might work best to fasten it on.

a two foot length of black pvc pipe, about 2.5 inches diameter

First of all, take a look with me at the seat back of the C2. It has a nice aesthetic look to it, curvy, sleek, matching the rest of the chair. It even has double slots on both sides, useful for attaching a cane holder.

curved plastic piece on top of the powerchair seat back

However, I felt that on top of this curved plastic cover, my round length of PVC pipe would stick out further than it needed to, and I also figured taking the cover off could expose a different set of slots in the actual seat back slots. The cover doesn’t do anything functional. It just hides the metal and bolts of the seat back and frame. Off it goes!!!

Here’s the seat back of the C2, naked:
metal powerchair frame with seat back bolted to it, plain and utilitarian

There are four bolts that go through the long slots in seat back and into the frame of the chair, meant to allow you to loosen the bolts and move the seat back up and down to adjust it to the height you like. This is a nice feature of the Whill design! To get the plastic cover off of the frame, I had to completely remove these bolts and the seat back, temporarily.

Already, you can see how this kind of modification goes. You have a simple idea: attach a length of tube to a wheelchair. You then realize you have to take apart more of the chair than you thought you would. Keep going back for more tools, more sizes of bolts, nuts, and washers, and so on.

To that end it is good to be extra prepared in your work area. Have a tray or bowl or two ready to hold screws and small parts. Have a sharpie and some tape to label things or even a notebook to take some notes!

It is also great if you have a secret hoard of a million different sizes of screws and bolts and little tools. Saves you having to go to the hardware store and lose all your momentum to finish a project!

Back to our hack!

Maybe I lied a little bit about the uselessness of the plastic cover: It has some little “ears” that stick up maybe half an inch, which are meant to help you hang something on the back of the chair. They aren’t big enough or tall enough to hold a substantial backpack, grocery bags, or anything real, in my opinion. I end up just looping the shoulder straps of my backpack all the way over the entire seat back.

So, as I looked at the slots in the newly naked seat back, I figured I could also add some hooks. Back to my workbench to dig around in the drawer of hooks and brackets. I had several possibilities!

an assortment of wall hooks and drawer knobs

The narrow black hooks seemed like the best fit. They came with screws to attach them to a wall. Since screws would not work well with the wheelchair frame, I had a search through my motley collection of nuts and bolts. It had to be a small bolt thin enough to fit through the hole in the coat hook, not too long so it didn’t end up poking me in the back, and I had to find a washer that would help stop the bolt from falling through the fairly wide slot.

Here is what I ended up with. M4 bolts, with hex socket heads, 15mm long. The washers aren’t quite right and don’t match each other. But they work well enough for now.

some not exactly right and not matching large washers holding the bolts on

I have a note to get better washers and also to get some rubber stuff to shove between the washers and the curved seat back, so that it won’t slip or come undone. (I have good luck going to hardware stores and just asking someone who works there to suggest an option!) Once I have some rubber rings or maybe even just a foam sheet in there, I could also add some vibra-tite or blue loc-tite to the bolt to keep it from coming loose.

As another critical step in this process, I added spare bolts and the right size hex keys to tighten them into my portable toolkit!

a small pouch with fix it zine and tools, bolts added to a little tin that goes in that kit

Finally I am ready to add my cane holder.

Or am I ?

I looked at the slightly battered piece of black PVC pipe. It will probably get covered with stickers so maybe I don’t care how it looks. But the edges were very rough where, a while back, I used my (glorious) cordless mini-ripsaw to hack a length of pipe off of a much longer piece. I imagined my grocery bags catching and tearing on it, or someone helping me load the chair into a car scraping against the jaggedy edges. A metal file and some sandpaper helped me to smooth down the edges nicely!

Then I used two cable ties through the holes I drilled, to pull it tight to the vertical bar of the seat back frame. It felt like it needed a little extra snugness so I added two black pipe cleaners around the frame and the entire pipe rather than through the holes. Gaffer tape, duct tape, or more cable ties also would have worked fine for this stabilization but I was curious how pipe cleaners would hold up.

Here is the final look. It doesn’t look too bad! It’s at least neat and compact, the hooks are black to match the frame color, my cane fits nicely into the holder, and the hooks will carry my backpack and several grocery bags as well!

cane holder and hooks now on the back of the powerchair

I was very happy with my little modification! I even remembered to clean up my workbench to put everything away, since I got out about 100 more things than I had originally intended to.

workbench covered with tools and bolts, with drawers labelled "hooks", "sandpaper", "lockpicks" and so on.

This should be written up as kind of a recipe rather than this log of my process, but a journal of how I figured out how to do this is also useful, I think!

Leave a Comment

Scanning with C.R.I.P.S.R.I.S.E.

I’ve written a lot about GOAT’s book scanning activities for our archival work, but today have another kind of scanning to talk about! Last week I met with @CriptasticHacker from C.R.I.P.S.R.I.S.E., to walk through the process of scanning a physical object for 3D printing. Buckle up, this is nerdy as hell!

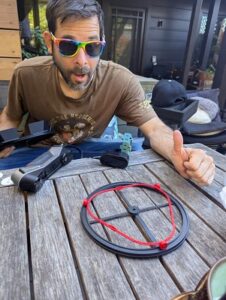
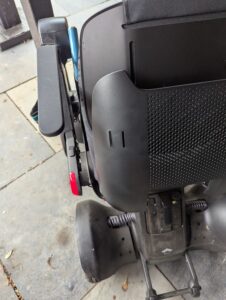
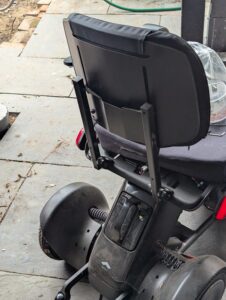
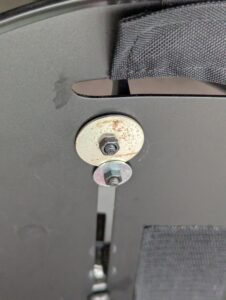
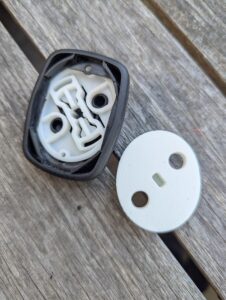
First of all I would like to show off the useful object that @CriptasticHacker brought to show me. His Whill powerchair joystick was slipping around, so he took it apart and had a look. It turns out the inside of the joystick has a plastic part that snaps onto a metal post. Because of the way it is designed, you can change the orientation of the joystick from vertical to horizontal so it fits your hand for steering. Over time though, and daily use, bits of that plastic part wore away so that the joystick slid around uncontrollably, making it hard to drive accurately. So he scanned that part, redesigned it, and 3D printed it.

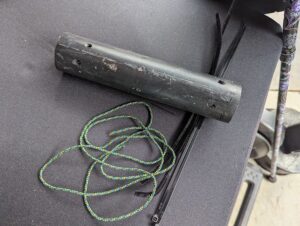
Here’s a comparison of the old and new parts side by side:

view of the inside of two plastic joystick interiors, one with holes in it and a worn out inner slot; the other freshly printed, solid, and robust

Pretty cool isn’t it?!

@CriptasticHacker is largely self taught over many years of watching free online videos and experimentation at home. There are also local and worldwide 3D scanning and printing communities where he has gotten advice and other resources.

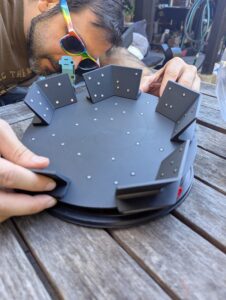
His original setup was a Creality Ferret, an infrared only scanner which you can buy for around $150. Very affordable! For this demo, he brought over a borrowed Creality Raptor, more expensive and more accurate which can do infra scans but also a blue laser scan. The Raptor is larger than the Ferret, but still quite portable. Along with that, he had a small turntable with dotted “reference points” on it in a regular pattern. (That turntable was made from 3D printed parts!)

There are also other accessories, like a carrying case, a portable handheld gizmo that looks like the things they use to do checkout in grocery store, tripods, etc. and extra stickers with more reference dots you can put onto larger objects that don’t fit onto the turntable. There is also an infrared spray But for this demo we stuck with the basics!

Our first step was for me to install the free Creality scanning software. With my 5 year old MacBook Air and a decent wifi connection this took just a few minutes to download and install. This software connected to the Raptor easily.

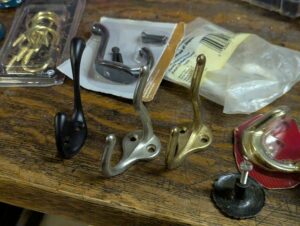
I was excited to try to scan something small but complicated. In a project bag I had out I happened to have an old prescription bottle with some screws in it so we took off the cap.

For people who may not be familiar with the free/open culture and “open source” vibe, I should explain that I 100% expected that someone, in fact multiple people, around the world have already scanned, cleaned up, and published designs for this exact sort of standard medicine bottle cap. That turned out to be true! Here are some examples from Thingiverse, Printables, and Yeggi, which are some popular platforms for designers to share their creations with the world, as a public good, often under Creative Commons licenses.

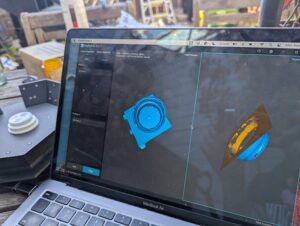
The software seemed pretty mysterious to me, but @CriptasticHacker walked me through the basic settings. For an older computer he recommends setting the resolution of the scan to lower than the default of .15mm; something more like .5mm. A lower resolution and lower frame rate means less precision for the final design and print, but also means a quicker scan time, and smaller file sizes and faster processing for the software tricks we were about to perform. I wanted to try with the defaults of .15mm resolution and 23fps frame rate, which luckily my computer was easily able to handle.

shot of the scanning software setup page with frame rate options and a "start scan" button

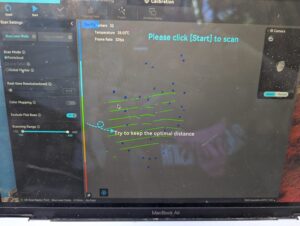
Our next step was to put the object on the turntable, hit “scan”, and turn the dolly slowly. As that happens, the image of the medicine bottle cap formed on my laptop screen first in an orange outline and then in blue “paint” as the surface was mapped more precisely. The goal of the scans is to get everything mapped in blue, as much as possible.

a guy in rainbow sunglasses bending over a scanning turntable to adjust it

We then stopped the scan and started a new scan with the cap flipped over. I wasn’t going for production quality — just enough to give me an idea of what it took to do a decent scan. Our two scans were about 300MB each.

With these two initial scans, the next step was to eliminate everything that wasn’t the stuff we wanted to print. That meant a pretty clunky process of lassoing and deleting parts of the image with a non-ideal navigation menu. Good luck with this if you don’t have great hand dexterity – if so, you will need to partner with someone else to massage your image files! I gave it a quick stab.

After the image cleanup, you have to match up the files so that they line up properly. In this case, we needed a point on top of the cap and at least two other points, to match points on the bottom. Our first two tries sucked, but then we kind of figured out how to align the files well enough to merge, or fuse, the two images. The end result was a 3-d looking object, a bit raggedy, but recognizable a screw top lid for a medicine bottle. We then exported this as an STL file which turned out to be about 5MB. Much better than the 600MB scan files we were manipulating in Creality’s software! STL files are a common format used by 3D printers.

From there, we uploaded the STL file into a CAD program. There are tons of CAD programs and people spend years becoming great at using them! Some are expensive but there are also free options. @CriptasticHacker showed me a free CAD program called TinkerCAD, that works in a web browser and that I think may be meant for children or at least, for educational settings. In this program we could further edit and manipulate our 3d printing file. So, for example, I could click on the pre-set shape options in TinkerCAD’s menu and drag a 3-d blob or some text over to the top of our bottle cap to add it.

It was really fun just being able to rotate and zoom in on this virtual object, and I felt like a wild, futuristic wizard doing it!!

laptop screen with two 3d images of a bottle cap rotated in different directions, behind it, the actual object on a turntable platform

If you weren’t actually scanning, and instead started with a base STL file, say, that you downloaded from Thingiverse or a similar platform, you could modify the file, add raised text or a more grabbable shape easily to the bottle cap. Then, you could export that new STL file and print it on a 3D printer.

And that’s another post for the future, when I will go through some of the printing process with C.R.I.P.S.R.I.S.E.!

There are other options that don’t require you to own a 3D printer and learn to use it. Local libraries or schools or makerspaces may have 3D printers, or experts to set them up and help you print. Under the U.S. Assistive Technology Act, there are programs in some states to provide 3D printed assistive tech for people, like TechOWL/CreATeLabs in Pennsylvania or WATAP in Washington state. Makers Making Change has many people who may 3D print stuff for you for free or a small fee.

Other options include looking for local or far-flung printing labs who will make stuff for you for a fee. I have not tried this yet, but am told that it has become surprisingly affordable and can be worth it for custom parts. Some that we talked about: Proto Labs, Makelab, Shapeways, Xometry, and JLC 3d Prints.

You can also print in different materials depending on what you need. PetG or PLA filament, nylon (tougher, but slower to print and needs a lot of ventilation to avoid fumes) or carbon fiber (toughest but also slowest).

A final thought form Criptastic Hacker and C.R.I.P.S.R.I.S.E.:

Disabled people deserve to have customized stuff! Not rattling half broken things that don’t suit our needs!

guy in rainbow sunglasses smiling and doing a big thumbs up at an outdoor picnic table

2 Comments

Adaptations on the street

I’m always fascinated by talking with other wheelchair users about the ways they customize and add attachments to their devices. Usually that means a lot of clips, bags, backpacks, pouches, velcro, cable ties, and so on. People develop a whole system of what to store where, depending on how they use their chair and how far to the side or back they can reach.

The other day on the bus I was chatting with the guy in the wheelchair spot across from me. I’ll call him “Kez” for anonymity! His chair was a very beat up, basic “hospital chair”, a heavy folding x-frame chair with a sling seat. He was super friendly and nice so I had to ask him why he had thin twine strung back and forth under his seat. It was quite thin and breakable looking, and a bit chaotically strung, like a net or web woven without much concept of creating a regular pattern. He explained that even though the string – almost thread! was so thin, it was still useful for carrying groceries or blankets under the seat. I offered to find him a bungee cord or two but he said no. Apparently a shelter where he stays doesn’t allow thicker string or rope or bungies, because it is considered a suicide risk.

Honestly this shocked me a bit! I am very curious to talk with him again and find out more details. I also want to talk with some shelter staff and find out more about their policies. If I could learn their rules then maybe I can think of some improvements that people like Kez can use. And I’m talking with other folks like C.R.I.P.S.R.I.S.E. about doing a sort of rolling survey, a bit more formalized, to find out what assistive tech help people in Kez’s situation might find useful. We can’t solve every problem a person on the street faces, but we could get a better idea of how to merge their DIY techniques with our expertise and resources to be of more practical help.

People with insurance and doctors have one set of problems in getting and maintaining their mobility gear; people dealing with Medicare have extra layers to that. Unfortunately, for everyone on the street in my city I’ve talked with there are orders of magnitude more problems. Literally “hacks” like tying one’s manual chair to one’s leg with rope so it is less likely to be stolen in the night.

A depressing reality. But it’s testimony to people’s creativity and DIY ingenuity to help themselves and their friends to survive.

Our second batch of “Fix It Kits” are in the works; a similar tool bag with small tools and supplies, but this version will be new: the Street Kit, to support people in precarious situations. It will include a local resources guide, a couple of useful tools, and more “on the fly” supplies like cable ties and velcro straps for quick modifications and emergency repair.

I have a version of this kit (with an added cargo net that I hope will pass muster as “safe” at shelters) that I’m carrying with me daily in case I run into Kez again on the street or on the bus!

My hope is that when they are distributed (by me or by others, maybe by local services organizations) I can collect some contact information and wishes/needs for other repairs or modifications. Stay tuned for more on the Street Kits!!

Leave a Comment

TechOWL and ATAP programs

There are a lot of programs for improving access to assistive tech at the state level, often supported by universities and independent living centers. TechOWL at Temple University in Pennsylvania is a great example, with tons of resources and material if you want to learn about AT options. It stands for Technology for Our Whole Lives. (We love a cute acronym here at GOAT!)
Resource centers like TechOWl exist in part in the U.S. because of support from the Assistive Tech Act of 1988.

Every U.S. state and territory has a mandate, and state funding, to give people access to learning about, trying out, and obtaining assistive tech via an Assistive Technology Act Project (ATAP).

They all do four things :

  • Lending library for assistive tech
  • Used equipment program, often run by a group of contractors or vendors.
  • Presentations and trainings, workshops
  • Consults and demos for people to problem solve and explore AT

So, TechOWL is the ATAP for the state of Pennsylvania.

A few years ago, because they had a staff member with some expertise in 3D printing, they started the CreATe Together project for 3D printing assistive tech. That has grown to become a well supported program with an online catalog of standard devices you can request (if you live in Pennsylvania), and they’ll find a partner to make it for you. They also can handle some custom requests.

It is an interesting model that I’d like to see more of in California, where we have Ability Tools as the main ATAP program, with a strong focus on reuse but not a lot of “maker” activity that I’ve found.

The level of AT you can make with a 3D printer seems a bit limited. In the TechOWL catalog we see mostly small gizmos that can help a person with grip strength or dexterity problems. This makes sense on one level because for AT that has a more critical function there could be quality control safety risks that a state funded program (with an array of loosely associated fabrication shops or volunteers with home workshops) is not prepared to handle.

On the other hand I could already use a bunch of these little plastic gizmos. A thing that punches pills out of those annoying blister packs? Hell yeah!

You can see a slightly wider array of 3D printable devices on sites like Printables or Creality – or the Internet Archive’s backup of older Thingiverse models.

It would be very interesting to go through all these sites and categorize the types of assistive tech that we can find there!

Leave a Comment

Right to repair review

Right to repair laws are a disability justice issue for those of us who need technological devices for our basic ability to function in the world. All of these things integrate with our bodies and lives in a deeply intimate level.

We may need to fix our wheelchairs, scooters, or powerchairs, things that give us mobility. We may need to understand our hearing aid, cochlear implant, screen reader, brailler, augmentive / assistive communication devices. Or we might need to maintain, troubleshoot, and repair prosthetic devices – a limb, a motorized brace, an exoskeleton, even an eye. They are our essential companions, part of our cyborg selves. Assistive tech shouldn’t be treated as a sort of rental or subscription, a cash cow service needed by the desperate to be exploited, or a throwaway victim of planned obsolescence.

Because of that tension, disabled people are often at the forefront of right to repair advocacy.

This helpful page from repair.org outlines the current legal landscape, state by state, for those of us who are fighting to fix our assistive tech: What are my repair rights?

Currently, there are state right to repair laws in California, Minnesota, Colorado, and New York; another bill is up for review in 2025 in Oregon and in many other states!

While this issue hits especially hard for disabled people, it’s just good common sense in many ways for anyone who buys or uses electronic devices.

It also makes sense for protecting the environment from piles of useless trash that pollutes the land around it with materials extracted from the earth at a great human and ecological price. The less we waste, the better – for everyone.

a wooden sign painted with the word REPAIR in an old fashioned font, on a workbench
Leave a Comment

Powerchair battery tinkering at General Lithium

Last week we held a little powerchair hack night with GOAT, Justin from General Lithium, CriptasticHacker and associates from Spokeland, Morgan from CIL, and more friends, to explore the battery technology of Whill Fi and Ci powerchairs. A Ci battery teardown is in progress along with an investigation into the Fi and its charger.

There was also knitting, and an adorable small support dog on a fluffy cushion. I had a cool moment realizing how many of us knew, or had worked with or learned from, John Benson (aka, “Cripple A”). I was thinking John, a fabulous human being, should get an award, and Morgan said, what he would really like is a parade. My mind took off with this great idea! What if we had a fabulous parade in his honor, with musical instruments and punk marching bands and a zillion wheelchair users zooming around?! We will also hopefully see him and some other repair and DIY wizards at our upcoming events!

a probably AI generated image of a futuristic looking glowing powerchair on a glowing disco platform

We didn’t do any formal talks or introductions, but CriptasticHacker kicked off by talking about one of his finished projects, the WBSW, Wheelchair Battery Spot Welder!

We have learned some things from cracking apart the Ci battery.

  • It has hidden screws under the bottom corner pieces
  • You still have to pry it open with a screwdriver and mallet
  • The battery is encased in several layers of totally sealed plastic for waterproofing
  • And under that it is podded, 5/6ths encased in rubbery gel stuff so you can’t really take it apart and hack it well.
  • It has 1/4 kWh

For the Ci, our best option to soup it up (as it has fallen out of warranty and parts don’t seem to be readily available!) may be adding a new battery or batteries, which we could do for about $400 per kWh. We could easily fit 2 of those under my seat in the undercarriage basket. Then those could hook up to a new replacement (V)ESC (Electronic Speed Controller) which we then connect to the motor (managing the voltage etc. so it will be compatible).

For the Fi, we were able to access it a bitbetter and Zach, Henner, mjg, and others had a look with digital microscope, logic analyzer, etc. To figure out what is going on with the power management . Zach will describe all that on his hackaday.io page!

three people gathered around an electronics workbench

It was interesting to see the different approaches in play at the various workbenches. The laborious and intensive work needed for detailed understanding and reverse engineering is in some ways a philosophical stance, of learning, reuse, and conservation, but in other ways, a factor influenced by resource constraints. In other words, necessity is the mother of the meticulous teardown! The people with capital, on the other hand, had less patience with this approach and were ready to throw resources at a problem, and use new (or repurposed) stuff to do complete workarounds, or simply throw it all out and invent something new that would be more rapid to get working, even if unlikely to be elegant or refined in the first prototype.

There was a long discussion on how to make a kit to convert manual chairs to power with Justin and Morgan. To that I added some wild eyed ideas but also a pointer to these interesting, cheap, DIY open source wheelchair designs and to Whirlwind Wheelchair. We see people every day in the Bay Area who are struggling with clunky or broken chairs. It is a good topic for future exploration – what other conversion kits are out there? What were the problems and pitfalls? How feasible is it to to come up with a maintainable, cheap, design for such a thing?

I learned during the event that ESC (pronounce the letters in it) is an electronic speed controller (the thing I normally just call “motor controller” with a vague handwave.) VESC, frequently mentioned by our hardware hackers, is a particular technology – or we could call it a movement – that I think looks amazing – for “flexible, efficient, and reliable power systems for your platform”.

Another cool nexus of ideas that came up: Whill chairs come with Bluetooth and a phone app. You can control the chair from the app, configuring it with one of three pre-set acceleration curves. Could we write a new app to communicate with the chair and program it in different ways?

You can also steer the chair from a phone or tablet screen via Bluetooth. I have never actually used this feature. But we can see that airports are starting to explore using Whill chairs on auto-pilot, to take passengers to their gates. Using programmed routes but also LIDAR, like robot cars! That put a gleam in several people’s eyes. Actually, it put a whole range of different and hilarious facial expressions on everyone’s faces!

And as one more note for future investigation: The chairs also appear to log and send diagnostic information to the manufacturer. I’d certainly like to see that traffic! I wonder if it is encrypted and what the heck it is sending!

I’m really looking forward to Grassroots Open Assistive Tech hosting more electronics and hardware tinkering nights, as well as other DIY gatherings!

Overheard:
(just for fun – it was a lively event!)

“I’m so impressed with the fact that you bypassed the VMS…. Expert move”

“….. and then it would explode!”

“That motorcycle [points to motorcycle in a giant pile of e-bikes] has a battery bigger and more powerful than a tesla powerwall. and it goes 160 miles an hour! [gleeful laughter]”

“You can control it via bluetooth? Woah!! That’s my kink!”

“There are no standards for bike wheels, so there are 4 different kinds of 26 3/4 wheels and none of them work with the others!”

(Justin): “I’m gonna take your 1/4 kWh battery and give you THREE kWh. We can just strap the batteries under your seat.”
(me:) “Oh, great! I’ve always wanted to be launched into fucking SPACE with my ass on fire!”

“Is this illegal?” “No surely not!” “Well, maybe? But we’re just taking things apart, and looking at how it works! How can that be illegal?”

(FYI: This can be a complex question! You may want to read this Coder’s Rights Guide from EFF as a starting point. )

More pics from the event:

Thanks to everyone who showed up, chatted, tinkered, and especially thanks to our congenial hosts, General Lithium – they are a battery tech company, but they also have a nonprofit wing that runs this maker/coworking space in the heart of San Francisco. Have a look at their events page and membership information!

Leave a Comment